If you want to reduce the file size of pixel-based images, you can do it in two different ways. You can:
1) downscale an image. Image height and width are reduced and the number of pixels decreases.
2) compress an image. This can be done lossy or lossless. In most cases, however, we are dealing with lossy compression.
And, of course, the two ways are often combined so that you end up with an image file with fewer pixels and high compression at the same time.
How can I resize images without quality loss?
This question is asked very often. The fact that the reduction of an image file without loss of quality is possible in principle has already been indicated under 2). Some file formats actually support lossless compression. This means that the file size can be reduced without losing image information. However, “without quality loss” often means that there is no directly visible quality loss. In that case, even lossy compression would be possible, making the file considerably smaller. In the next sections you will learn how image files are compressed in detail and which file formats you should know in this context.
Which file formats are suitable for lossless reduction?
The two main formats that support lossless compression are TIFF and PNG. However, after compression, the files are usually still very large compared to those in the format that is the most popular for storing photos. What is meant here, of course, is the JPEG format.
Because digital photos are very often in JPEG format, we will mainly focus on this file type in this article. By the way, there is no difference between JPEG and JPG. The shorter form is just a relic of older Windows versions that provided only three characters for the extension.
How can I reduce the number of pixels in an image?
For most purposes, you don’t need a full-resolution image that can be printed at calendar size. For example, if you have photos intended for use on a website or want to send thumbnails via email, you should first start by reducing the pixel dimensions, thus reducing the number of pixels. As already mentioned, this process is called downscaling. It can be implemented with very different tools depending on the device and operating system. We can therefore only present a small selection here and start with a classic application that you are certainly familiar with.
Reduce image dimensions with Microsoft Paint
In Windows, you can simply use the Paint program to downscale image files. So you don’t even have to install any software, but get by with the operating system’s on-board resources.
And this is how it works:
1. start Paint and open the desired file (alternatively: right-click on File > Open with > Paint)
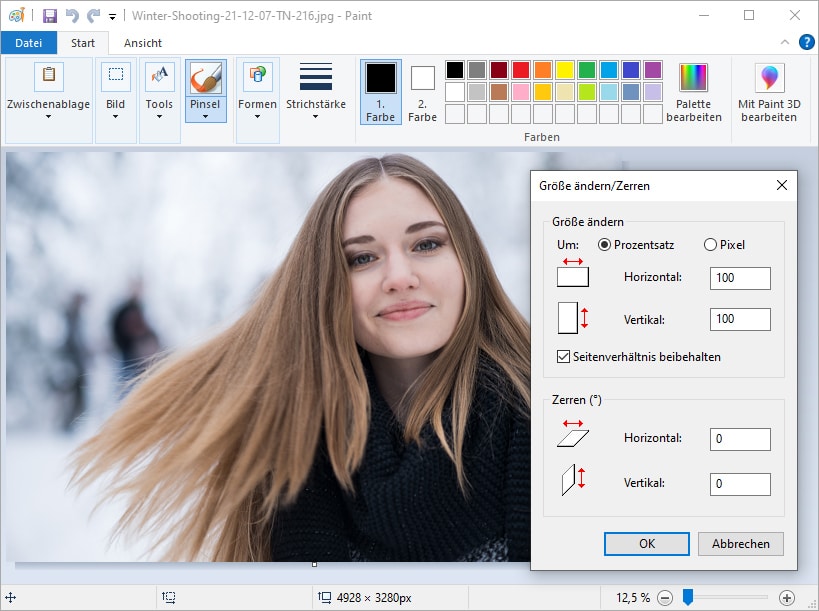
Navigate to Image > Resize in the menu.
Enter a new value (either percentage or number of pixels) in the Horizontal or Vertical fields. If the checkmark under Keep aspect ratio is set, it is sufficient to enter a value.
Screenshot Microsoft Paint on Windows 10
After you click OK, all you have to do is save the image. Best under a new file name(Save as), otherwise the original file will be overwritten.
Unfortunately, Paint does not allow you to choose from different JPEG compression levels. To heavily compress images in addition to any scaling you’ve done, you’ll either need to download additional software or use one of the many online services. Both have their advantages and disadvantages, which we will discuss later.
How can I resize multiple images at once?
The reduction of multiple image files in one pass is done by so-called batch processing. The most elegant way to do this is certainly by command via a shell like Bash or PowerShell. However, the handling via command line is a big hurdle. After all, the vast majority of users only know how to work via a graphical user interface and are not familiar with the syntax of a shell. In this respect, we first introduce here the image viewer IrfanView, which allows batch processing without the knowledge of commands and yet is comparatively powerful.
Variant 1 – Batch processing with IrfanView
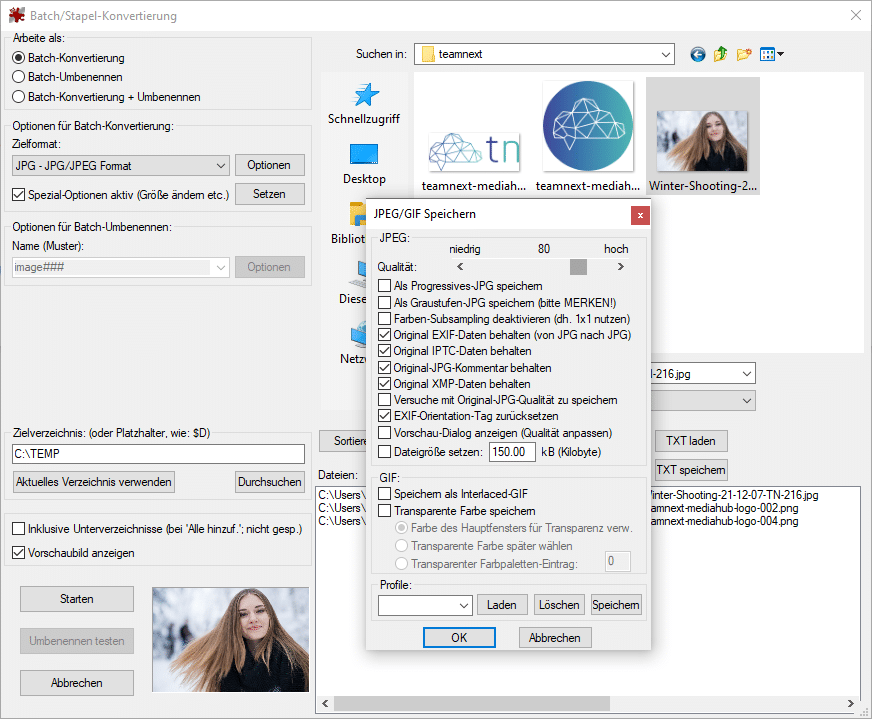
With IrfanView, images can be batch scaled and compressed as desired by making the appropriate settings using sliders and buttons. To do this, navigate in the menu to File>Batch (batch) Conversion / Renaming.
As the attached screenshot shows, 100 quality levels are possible for JPEG files. In addition, there are numerous other setting options. The Set File Size option is especially handy. Each individual file is then converted to match the target size.
Screenshot from IrfanView 4.60 under Windows 10
If you want to scale the files at the same time, you have to check Special operation active and define the corresponding operation under Set.
Although programs like IrfanView or XnView are free for private and educational use, commercial use in companies requires a license. In addition, the aforementioned solutions are not exactly characterized by intuitive usability. But – and this is their advantage – you can batch process a lot of settings with them once you get the hang of them.
For our command line example, we will use Windows PowerShell. The free software ImageMagick is a good tool for this. With ImageMagick you can reduce large amounts of images if you know a few simple commands. We would like to present two of them to you as examples:
magick mogrify -resize 800 *.jpg *.jpeg
Meaning: All JPEG files in the source directory (both file extensions considered) are scaled to 800 pixels (longest side).
magick convert -quality 10 *.jpg *.jpeg
Meaning: All JPEG files are converted to quality level 10 (minimum 1, maximum 100) and compressed accordingly.
Notes: mogrifyoverwrites the source files, convert creates new files. When using Bash, omit the preceding magick.
By the way, the performance of ImageMagick is enormous, even folders with hundreds of files are processed by the program within a very short time.
How can I reduce the size of images with Photoshop?
Of course, the professional image editing program Adobe Photoshop allows both: reducing an image via scaling as well as via compression.
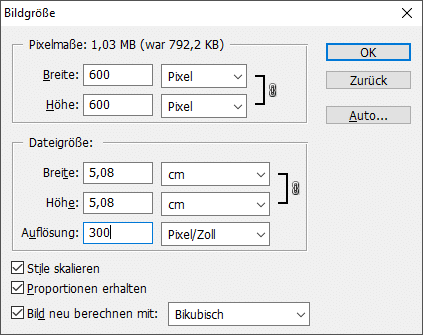
To scale an open image, press Ctrl+Alt+I or click Image Size under Image in the main menu. The screenshot attached here is more or less self-explanatory. At the top you have to enter the desired pixel dimensions, at the bottom the calculated size will appear (in cm, mm etc.) A click on OK and the corresponding setting will be applied to the image.
Scaling in Adobe Photoshop
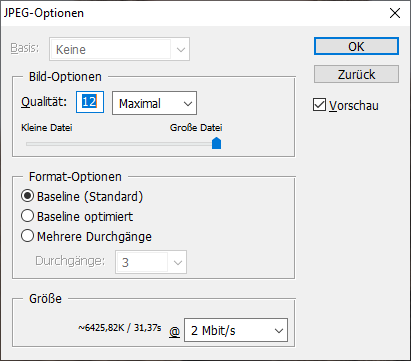
Different JPEG compression levels can be selected when saving a file. To do this, go to File>Save As and select the JPEG format. A small window opens that allows you to choose from 12 quality levels.
JPEG options in Adobe Photoshop
Batch processing is also possible with Adobe Photoshop. However, the routine must first be created and saved. To do this, go to File>Scripts>Image Processor in the menu. After you have specified the source folder, destination folder and the parameters you want to use, finally click Run.
How can I resize images with GIMP?
With the free software GIMP it works similar to Adobe Photoshop.
Open the file you want to reduce.
Click ScaleImage under Image in the main menu.
In the Image Size section, specify the desired pixel dimensions.
In the Quality section you can select how the pixel values of the scaled image are calculated (interpolated). Note: This is not to be confused with the JPEG quality levels.
To select the compression, click on Export as in the File menu and select JPEG as the file type. Under Quality, a value between 1 and 100 must then be selected, with 92 set as the default value.
Batch processing is also possible with GIMP, but you first need to install an appropriate plugin. In order not to complicate matters unnecessarily, we will therefore leave it at this information and refer to this article.
How can I resize images on an Android device?
For cell phone photos there is a little trick: just take a screenshot of the image to be resized, because the screenshot usually takes up less memory than the original file. Why? Well, the resolution of the camera is usually much higher than that of the display in modern smartphones. So a screenshot leads to a downscaling. You may then need to crop the screenshot to remove any distracting black borders. However, the device’s on-board resources are usually quite sufficient for this.
Update: The process is only useful if screenshots are saved as JPEG files. Unfortunately, newer Android versions only generate files in the lossless PNG format for screen captures, which is rather unsuitable for photos.
Alternatively, there are of course numerous third-party apps that can be used to selectively scale and / or compress images. As an example, we can mention the app Image Size – Photo Resizer, which is available for free in the Google Play Store and financed by advertising.
How can I reduce the size of pictures with iPhone?
The most elegant solution for the iPhone is certainly Apple’s Shortcuts app. Once the application is installed, proceed as follows:
Step 1: Open the app Shortcuts > Tap Add Actions > Enter Resize Images in the search box and select the Resize Image action. Now enter the desired pixel dimensions.
Step 2: Tap Next > Name the shortcut (e.g. “Reduce Image”) > Finally, tap Done and the shortcut will be activated.
Step 3: From now on, when you use the Photos app, you can say “Siri, shrink picture” and the command will be implemented automatically.
Of course, there are also numerous third-party apps for the iPhone (or for iOS) that are dedicated to image reduction. For example, there’s the same app as the one mentioned for Android in Apple’s App Store. Or one can use the also very popular app called PicsArt.
How can I resize images for an email?
If you are a Mac or iPhone user, it is quite simple. Apple’s in-house email app (Mail) already has a very handy feature built in to shrink photos. If you want to attach an image to an e-mail, the application automatically confronts you with the choice of file size. You can choose between: Small, Medium, Large and Original Size.
Windows or Android users have a somewhat more difficult time. Just take a look at the relevant sections of this article, or – and this is perhaps the best option – think about sending the full-size images via a service like WeTransfer. Sending a download link is the more elegant solution anyway. We have summarized everything you need to know for this in a separate article for you. You can access it here.
How can I resize images online?
With ad-financed online services such as iloveimg.com, the operation is kept so simple that it is more or less self-explanatory. Such sites are aimed at users who have little knowledge of image editing. You can either downscale or compress image files on iloveimg.com, and you can even do it in batches (maximum 30 files). The also popular service compressjpeg.com, on the other hand, only offers compression of JPEG files. There, there may be a maximum of 20 files per run.
How can I resize PNG images (online)?
If you have a PNG file, it is already compressed, but lossless, so if it contains photographic elements, the file is still several megabytes in size – too much for fast loading on web pages. In such cases, one can benefit from lossy compression. The provider tinypng.com has recognized this and offers such conversions via its website. The files are analyzed there and then rewritten with slightly less color gamut. Often, 70 percent data volume can be saved in this way, without any visible difference.
Disadvantages of free online services
What the above services do is all well and good, but there is of course a catch, at least if you care about your private data. In that case, you should think twice about uploading your photos to servers where you don’t know who is behind it and how the data will be handled. Of course, such websites always assure that uploaded images will be deleted immediately. Whether this actually happens is another matter, of course. In addition, photos can also contain sensitive metadata. As an example, GPS coordinates can be used to draw conclusions about your last whereabouts. Such data may also end up in the hands of third parties through an upload for the use of an online tool.
The solution for professionals – a cloud-based image management made in Germany
If you came across this article because you occasionally need to resize a few images, the Paint variant may be enough for you. If, on the other hand, you are regularly confronted with the task of bringing large quantities of images into the correct target format and size, and at the same time you attach importance to flexible access options, then there is no getting around a professional solution.
At teamnext, we have developed a cloud-based image management solution aimed at customers who need to develop, maintain and leverage larger media pools. Our Media Hub supports all common image and video formats and allows easy and fast conversion to any size and to the most important final formats, of course also via batch processing.
We also place a particularly high value on the data protection-compliant storage of all media files. We do not use any third-party tools and process your data exclusively on servers in European data centers: highly secured and DSGVO-compliant.
If we have made you curious and you just want to try out the various functions of our image management, you can get started right away by choosing a free 14-day trial for teamnext | Media Hub. In addition, you are invited for a free online product demo with one of our experts at any time. Simply use our contact form for this purpose.
https://www.teamnext.de/wp-content/uploads/2022/09/fotos-hochladen-und-verwalten.jpg7201800Björn Buxbaum-Conradihttps://www.teamnext.de/wp-content/uploads/2022/03/teamnext-mediahub-logo-bunt.svgBjörn Buxbaum-Conradi2022-08-30 17:40:322024-11-28 16:25:18Upload and manage photos in the cloud: 4 different application types
https://www.teamnext.de/wp-content/uploads/2022/07/digital_asset_management_dam_header.jpg4901200Björn Buxbaum-Conradihttps://www.teamnext.de/wp-content/uploads/2022/03/teamnext-mediahub-logo-bunt.svgBjörn Buxbaum-Conradi2022-07-18 10:37:472023-11-16 17:34:56What is digital asset management? Get to know the advantages
You are currently viewing a placeholder content from Vimeo. To access the actual content, click the button below. Please note that doing so will share data with third-party providers.
You are currently viewing a placeholder content from YouTube. To access the actual content, click the button below. Please note that doing so will share data with third-party providers.

 https://www.teamnext.de/wp-content/uploads/2022/09/fotos-hochladen-und-verwalten.jpg
720
1800
Björn Buxbaum-Conradi
https://www.teamnext.de/wp-content/uploads/2022/03/teamnext-mediahub-logo-bunt.svg
Björn Buxbaum-Conradi2022-08-30 17:40:322024-11-28 16:25:18Upload and manage photos in the cloud: 4 different application types
https://www.teamnext.de/wp-content/uploads/2022/09/fotos-hochladen-und-verwalten.jpg
720
1800
Björn Buxbaum-Conradi
https://www.teamnext.de/wp-content/uploads/2022/03/teamnext-mediahub-logo-bunt.svg
Björn Buxbaum-Conradi2022-08-30 17:40:322024-11-28 16:25:18Upload and manage photos in the cloud: 4 different application types